USER_MANUAL
Complete guide to installing and using AudioBash on Windows and macOS.
01 INTRODUCTION
AudioBash is a voice-controlled terminal application designed to work seamlessly with Claude Code. Instead of typing commands, you can speak them directly into your terminal. The application transcribes your voice input using AI-powered speech recognition and executes commands in a real terminal environment.
Key features
- Push-to-talk voice input - Hold a hotkey to record, release to transcribe and execute
- Multi-provider transcription - Choose from Gemini, OpenAI Whisper, Claude, or Groq
- Real terminal environment - Full PTY (pseudo-terminal) with shell access
- Agent mode - AI-powered command generation for complex tasks
- Cross-platform - Works on Windows 10/11 and macOS (Intel & Apple Silicon)
02 INSTALLATION
Windows installation
System requirements
- Windows 10 or Windows 11
- 4GB RAM minimum (8GB recommended)
- 200MB disk space
- Microphone for voice input
Installation steps
-
1
Download the installer
Visit the releases page and download
AudioBash.Setup.2.1.1.exe -
2
Run the installer
Double-click the .exe file. If Windows SmartScreen appears, click "More info" then "Run anyway"
-
3
Launch AudioBash
Find AudioBash in your Start Menu or use the desktop shortcut
-
4
Grant microphone access
Windows will prompt for permission on first use - click "Yes" to allow
macOS installation
System requirements
- macOS 11 (Big Sur) or later
- Apple Silicon (M1/M2/M3/M4) or Intel processor
- 4GB RAM minimum (8GB recommended)
- 200MB disk space
- Microphone for voice input
Installation steps
-
1
Download the DMG
Visit the releases page and download:
- Apple Silicon (M1/M2/M3/M4):
AudioBash-2.1.1-arm64.dmg - Intel Macs:
AudioBash-2.1.1.dmg
- Apple Silicon (M1/M2/M3/M4):
-
2
Install the app
Double-click the DMG, drag AudioBash.app to Applications, then eject the DMG
-
3
First launch (important!)
Because AudioBash is not notarized by Apple, you must bypass Gatekeeper:
Method 1 - Right-click (recommended)
Open Finder → Applications → Right-click AudioBash.app → Select "Open" → Click "Open" in the dialog
Method 2 - Terminal command
xattr -cr /Applications/AudioBash.app -
4
Grant permissions
macOS will request:
- Microphone access: System Settings → Privacy & Security → Microphone
- Accessibility access: System Settings → Privacy & Security → Accessibility (required for global hotkeys)
03 FIRST-TIME SETUP
Step 1: Choose your transcription provider
AudioBash supports multiple AI providers for speech-to-text:
| Provider | Best for | Get API key |
|---|---|---|
| Gemini (recommended) | Fast, accurate, free tier | aistudio.google.com |
| ElevenLabs Scribe v2 | Real-time (~150ms), VAD auto-commit | elevenlabs.io |
| OpenAI Whisper | High accuracy | platform.openai.com |
| Claude | Anthropic ecosystem | console.anthropic.com |
| Groq | Very fast | console.groq.com |
Step 2: Enter your API key
- 1. Click the gear icon in the top-right corner
- 2. Select your transcription provider from the dropdown
- 3. Paste your API key in the text field
- 4. Click "Save"
Step 3: Test voice recording
- 1. Press
Option+S(Mac) orAlt+S(Windows) to start recording - 2. Say a simple command: "list files in current directory"
- 3. Press the hotkey again to stop
- 4. Watch the transcription appear in the terminal
04 USING AUDIOBASH
Keyboard shortcuts
| Action | Windows | macOS |
|---|---|---|
| Start/stop recording | Alt+S |
Option+S |
| Cancel recording | Alt+A |
Option+A |
| Toggle raw/agent mode | Alt+M |
Option+M |
| Show/hide window | Alt+H |
Option+H |
| Clear terminal | Alt+C |
Option+C |
| Cycle layouts | Alt+L |
Option+L |
| New tab | Ctrl+T |
Cmd+T |
| Close tab | Ctrl+W |
Cmd+W |
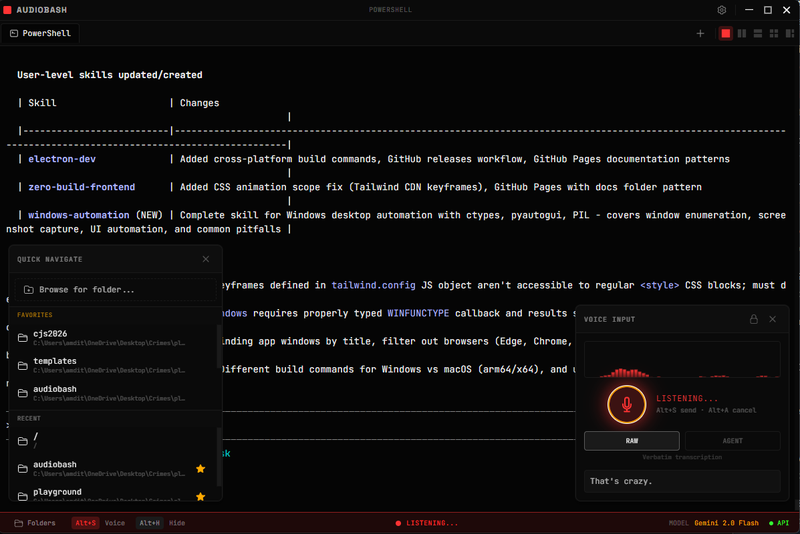
Voice recording
AudioBash uses a push-to-talk model:
- 1. Press the hotkey to start recording
- 2. Speak your command clearly
- 3. Release (or press again) to stop and transcribe
Voice input panel with waveform visualization and RAW/AGENT mode toggle
Recording states
Terminal modes
AudioBash has two modes for handling voice input:
Raw mode (default)
Transcribed text is sent directly to the terminal. What you say is exactly what gets typed.
Best for: Simple commands, when you know exactly what to type
Types:
cd projects
Agent mode
An AI interprets your intent and generates the appropriate command. Handles natural language requests.
Best for: Complex tasks, when you're unsure of exact syntax
Generates:
find . -name "*.js" -mtime -7
Toggle between modes with Alt+M (Windows) or Option+M (Mac).
Multi-tab interface
AudioBash supports multiple terminal tabs:
- New tab: Click the
+button or pressCtrl/Cmd+T - Switch tabs: Click on tabs or use
Ctrl+Tab - Close tab: Click the
×on the tab or pressCtrl/Cmd+W - Rename tab: Double-click the tab title
Each tab maintains its own working directory, command history, and shell session.
Quick navigation with favorites and recent directories
05 SETTINGS
Access settings by clicking the gear icon in the top-right corner.
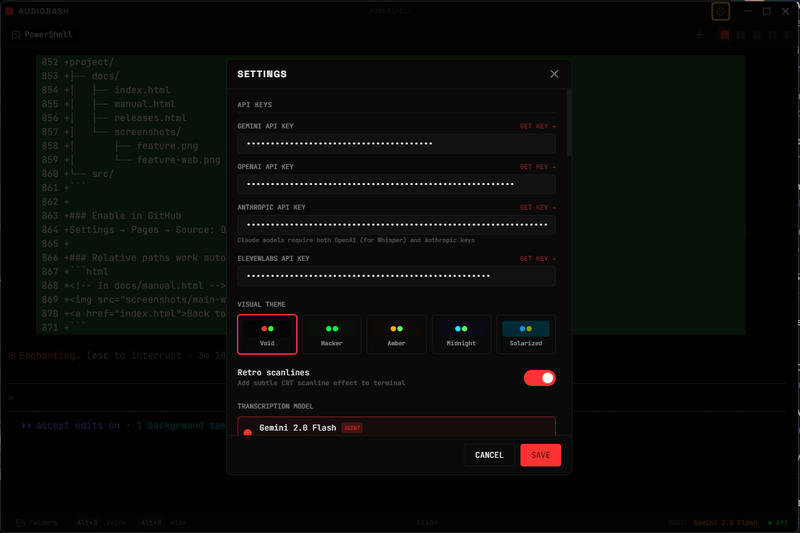
API keys and visual themes
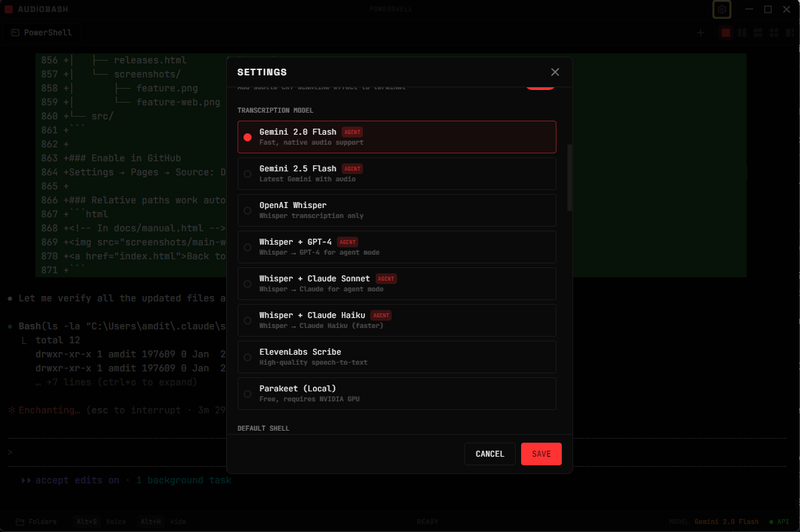
Transcription model selection
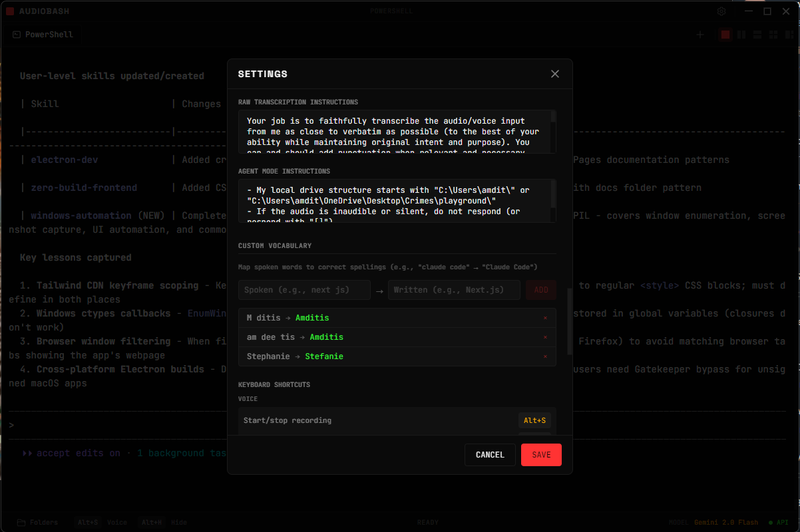
Custom instructions and vocabulary
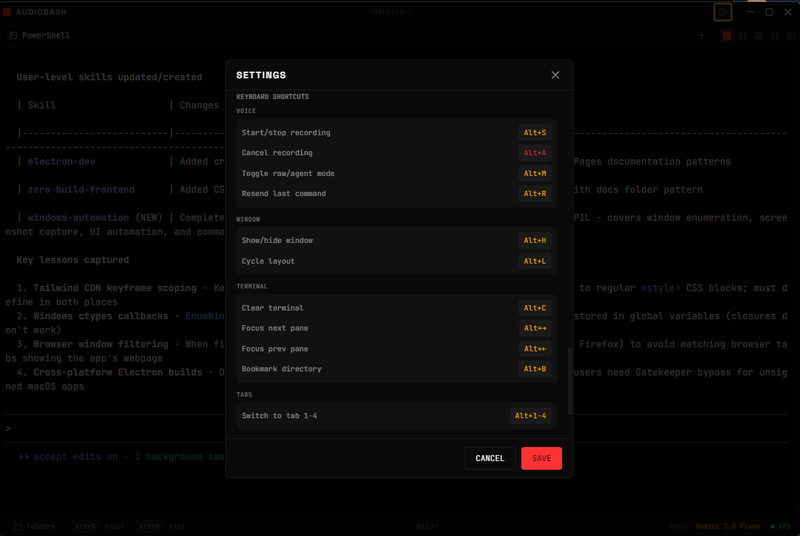
All keyboard shortcuts
API keys
| Setting | Purpose |
|---|---|
| Transcription API key | Speech-to-text (Gemini, OpenAI, etc.) |
| Claude API key | Agent mode intelligence |
| ElevenLabs API key | Text-to-speech responses |
Transcription providers
- Gemini 2.0 Flash - Google's fast, accurate model (recommended)
- ElevenLabs Scribe v2 - Real-time WebSocket streaming (~150ms latency)
- OpenAI Whisper - Industry-standard accuracy
- Groq Whisper - Ultra-fast processing
- Claude - Uses Anthropic's model
Mobile remote control
Control AudioBash from your phone using the web-based remote interface:
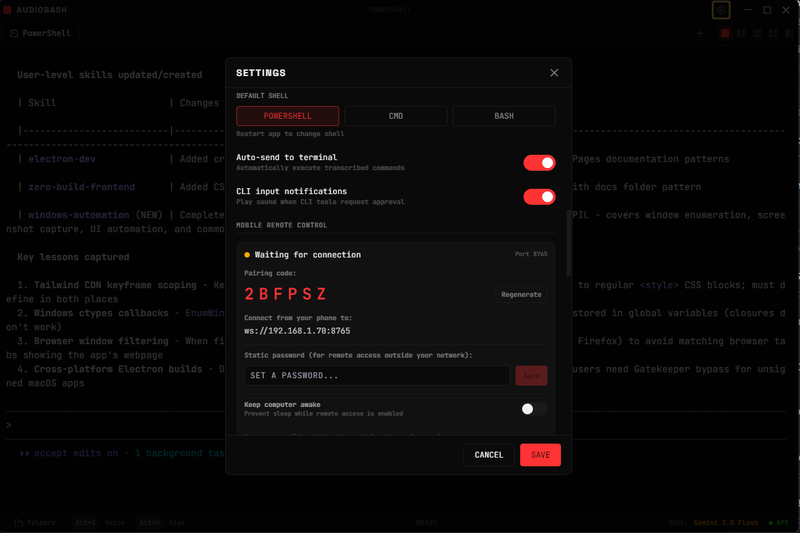
- 1. Open Settings and scroll to "Mobile Remote Control"
- 2. Set a password for secure remote access
- 3. On your phone, visit remote.audiobash.app
- 4. Enter your tunnel URL and password to connect
- 5. Use voice commands or type text directly
For local network only: use the IP-based WebSocket URL shown in Settings (requires same WiFi network)
06 TROUBLESHOOTING
Windows issues
"Windows protected your PC" SmartScreen warning
Click "More info" → "Run anyway". This appears because the app isn't signed with an expensive certificate.
Global shortcuts not working
Check for conflicts with other apps, try running AudioBash as Administrator, or restart the app.
macOS issues
"AudioBash is damaged and can't be opened"
This is Gatekeeper blocking an unsigned app. Fix with:
xattr -cr /Applications/AudioBash.appGlobal shortcuts (Option+S) not working
Go to System Settings → Privacy & Security → Accessibility. Find AudioBash, toggle it off and on, then restart the app.
General issues
"API key is invalid" error
Double-check you copied the entire key, verify it's for the correct provider, and check that billing is set up if required.
Transcription is inaccurate
Speak more slowly and clearly, reduce background noise, try a different provider, or check your internet connection.
07 FAQ
Is AudioBash free?
Yes! AudioBash is free and open source. The AI transcription services require API keys, which may have usage costs depending on the provider. Gemini offers a generous free tier.
Does AudioBash work offline?
No. Voice transcription requires internet connectivity to reach the AI provider APIs.
Can I use AudioBash with any shell?
Yes. On Windows, it defaults to PowerShell. On macOS, it uses your default shell (usually zsh or bash). You can start any shell by typing its name.
Can I use AudioBash with Claude Code CLI?
Absolutely! That's exactly what it's designed for. Just type claude in the terminal to start Claude Code, then use voice commands to interact with it.
Where are settings stored?
Windows: %APPDATA%\AudioBash\
macOS: ~/Library/Application Support/AudioBash/
How do I report bugs or request features?
How is it connected to the terminal? Is it linked to external terminal windows 1, 2, 3, etc.?
No, AudioBash doesn't link to external terminal windows. It has its own embedded terminal built in. The app uses xterm.js for the terminal display and node-pty to spawn real shell processes (PowerShell on Windows, zsh/bash on macOS). When you speak, the transcribed text is sent directly to the active terminal tab within the app. Each tab runs its own independent shell session - there's no connection to Terminal.app, Windows Terminal, or any other external terminal program.